How to Prep your Site for a Native Seed Mix
SITE PREPARATION IS AN ESSENTIAL STEP TO A SUCCESSFUL NATIVE PLANTING
Proper site preparation will greatly reduce competition from undesirable species and allow for better establishment of slow-growing perennials. Most sites will require 1 full season of site preparation starting in the spring and ending in the fall. If you have a small site located in a well-manicured lawn, site preparation may be possible in a single afternoon. The most common methods are described in detail below.
Do not underestimate the weed seed bank of your soil. The weed seed bank holds the accrued deposits of dormant weed seeds that have been falling on the soil, sometimes for many years. Weed seed dormancy can be broken by even slight soil disturbance, a change in soil temperature, or a brief exposure to light. These events can cause a flush of new weeds to germinate on a site that previously appeared to be clean. Ideally, site preparation will eliminate the existing plants on site, but also spur the germination of the weed seed bank so they, too, can be eliminated. Although it is tempting to cut corners during this step, the time invested in site preparation is well spent.
SOD REMOVAL
This method is great for homeowners looking to convert part of their lawn into garden beds. A sod remover is a gas-powered, or hand-held tool that will slice off the top few inches of grass and soil. They are available to rent at many hardware and home improvement stores. Although this method is labor intensive, it can allow for very quick site preparation. Sod removal is not recommended for large areas or sites with a lot of weeds.
SMOTHERING OR SOLARIZATION:
Smothering weeds can be an effective site prep method without the use of any chemicals or special equipment. The idea behind smothering is simple; covering the soil surface for an extended period will kill unwanted plants underneath due to heat and/or lack of light. Common smothering materials include industrial-weight tarps, black or clear plastic, wood paneling, and cardboard covered with wood mulch. It is important to be sure to secure the smothering material with heavy rocks, pallets, or by burying the edges. This will prevent wind from blowing the material off and discourage tenacious plants from pushing the material up from the ground. On smaller sites, cardboard is a good approach. To find large pieces, check your local appliance store to see if they have recycling you can reuse. On larger sites, plastic from tarps or hoop houses can be used. If you live in an agricultural region, you may be able to salvage discarded plastic from local farms.
While smothering will eliminate surface plants, a large weed seed bank may remain in the soil. Once an initial smothering period has occurred, removing the cover from the site will allow weeds from the soil seed bank to germinate. Replace the cover to kill the newly germinated seedlings. This on-again off-again cycle of germination and smothering can be utilized to prepare even the weediest pastures.
Smother/Solarize Example: Timed intervals of 4 to 5 weeks “on” and 1 to 2 weeks “off” can allow multiple waves of weed seeds to germinate before being killed during the following cycle of smothering. Some weeds need to be covered for two years. Smothering a lawn takes less time; usually it can be killed in two months by a close mowing before covering.
REPEATED SHALLOW CULTIVATION:
Repeated cultivation is a good option for large sites, especially on flat, organically managed land. The key for success using this method is understanding that soil disturbance exposes seeds in the soil seed bank and is followed by more weed growth. To prepare a site with cultivation, soil disturbance must be repeated and continue until the end of the growing season.
Mechanical cultivation is usually accomplished with a tractor and a disc. Shallow discing should be timed to eliminate freshly germinated weed seedlings; once your site greens up after cultivation, disc again. Some sites may require 2 years of cultivation, particularly those with invasive or perennial weeds.
HERBICIDE:
We at Prairie Moon are proud of our organic farming legacy, but we also view the responsible and judicious use of herbicides as an effective tool for native ecosystem establishment. Always read labels on herbicide products and use caution when working with these chemicals.
Herbicide is most effective over a full growing season. Depending on the weed problem on your site, short-term herbicide use as the only form of site prep can yield less-desirable results.
Site preparation is the first step in a multi-step process. Establishing a successful native prairie from seed is a labor of love and patience. Most who have been through it will praise the process, the thrill of discovery, and the joy of transforming a space into a healthy ecosystem. For more details on the next steps check out Growing Your Prairie
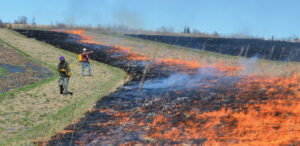
YEAR 1: SITE PREP AND SEEDING
The first growing season should be dedicated to site preparation, a crucial first step to a successful planting. On this site, herbicide was applied three times spring through fall. After site preparation is complete, seed can be sown.
YEAR 2: MOWING
Keeping the site mowed to 4-8” during the first year of growth will control any remaining weeds, allow sunlight to reach the slow-growing perennials and promote strong root growth.
YEAR 3: PIONEER FLUSH
The season after planting there will only be a few native species that flower. This stage is known as the Pioneer Flush. It can take 3-5 years after planting for most perennials to bloom for the first time.
YEAR 4: DIVERSITY OF BLOOMS
As time goes on, more and more perennial wildflowers will start to bloom.